
![]() Booking and Appearances |
The Conclave | Convention
Report | The Family Album |
Ghost Stories
| Historical Vault | The
13 List
Booking and Appearances |
The Conclave | Convention
Report | The Family Album |
Ghost Stories
| Historical Vault | The
13 List
Originally written for the Patient Creatures website, October
2002 edition, this essay contains advice for Halloween costumes.
*******************
 Halloween
is coming, a time for a national “Come-As-You-Aren’t”
party, when you get to unleash your wildest fantasies and darkest
fears. Easy, right? Just run down to the corner five-and-ten,
plunk down a few bucks on a packet of make-up and a costume in
a bag, and you’re on your way. Or grab a magazine with an
article on last-minute costumes you can make from items around
the house, undo your shower curtain, and voilà, instant
costume.
Halloween
is coming, a time for a national “Come-As-You-Aren’t”
party, when you get to unleash your wildest fantasies and darkest
fears. Easy, right? Just run down to the corner five-and-ten,
plunk down a few bucks on a packet of make-up and a costume in
a bag, and you’re on your way. Or grab a magazine with an
article on last-minute costumes you can make from items around
the house, undo your shower curtain, and voilà, instant
costume.
Well, if your goal is a sack of stale candy corn, or just fulfilling the minimum basic requirement for “costume party” then that’s fine. Have fun and enjoy the holiday.
But if you want to make a real impression, be astonishingly beautiful, bone-chillingly scary, or just make people say, “great costume, dude,” you’re going to have to do a little more.
The effectiveness of a given costume can be boiled down to the basic equation: time+money=impact. If you have a lot of money, you can buy or rent something impressive, and not spend much time, but if you don’t have a lot of money, you’re going to need to get started early. Here are some basics:
Getting Started~
First, think about what you want to be, and think about how this matches to your own physical appearance. One thing people tend to put out of their minds is what costume suits their body types. Now, the costume itself can compensate for some things, but there’s only so far you can go. For instance, if you’re six-foot-four, you’re going to have trouble pulling off a Hobbit. Or if you’re five-foot-nothing, dressing as Frankenstein’s Monster may not be so impressive. And, let’s be honest, only people in really good physical shape look good in Superman’s tights. So take a good look at yourself and pick a character that suits you well.
Incidentally, these rules don’t apply
to children’s costumes. Kids, by special dispensation of
the spirits of Halloween, are allowed to dress as whatever they
wish. The  holiday
is for them, after all. I’m talking about adults above, who
don’t have the natural charm that comes with youth and must
compensate in other ways.
holiday
is for them, after all. I’m talking about adults above, who
don’t have the natural charm that comes with youth and must
compensate in other ways.
Anyway, once you’ve chosen what you want to be, it’s time to do a little research. Get at least one good picture of what you want the final result to look like (this can be a drawing or photograph). It doesn’t need to be overly detailed, it just needs to give you a focal target so you don’t get going in too many directions at once. It also gets your mind looking for certain shapes and textures you may incorporate into your costume. For instance, I knew a girl who wanted to go as a tube of toothpaste, and with the image of the tube in her mind spotted a small pleated lampshade that worked perfectly as a cap.
Once you’ve gotten the image, make a list of what supplies you think you’ll need and what you’ll need to do. Include all your ideas; you can always eliminate some later. It might look something like this:
Cinderella
-Fancy gown
-Tiara
-“Glass” slippers
-Do hair up or get a wig
-Do glamorous make-up
-Pumpkin?
-Jewelry?
Now it’s time to work on getting the items on the list. Below are some general tips to help with your costume:
Make-up~
Start by going to your local costume shop or theatrical supply (one that’s there all year, not the ones that open a few weeks before Halloween and are out of business November 1st). The employees there are generally very helpful in finding the right products and teaching you how to apply them. But DON’T wait until the Saturday before Halloween, when everyone and their cousin will be there. Go a few weeks beforehand, or mid-week, when the store is less crowded and they can give you more attention. Take along your reference picture.
The best make-up is smooth and creamy, and goes onto your skin evenly without lumps or “gritty-ness.” Ask your clerk to let you try a sample on the inside of your wrist (where the skin texture is similar to the face) to see how it feels and looks.
It comes in a variety of shapes and sizes, depending on the use. For instance, if you are covering your entire face in red, get a large tube or tin. If you’re painting with several colors to suggest a striped cat, say, you might want to pick up a few grease pencils in the colors required. What you don’t want to do is buy a sample-pack with several colors if you only need two or three. Chances are you won’t have enough of the color you need and be left with cakes of colors you’ll never use. These also tend to be of lower quality.
Listen to the clerk’s instructions on how to apply, and take notes if necessary. You’ll probably need to set the make-up with powder once it’s been applied, to keep it from smearing or rubbing off too quickly, and this takes a bit of time. You might want to do this outside if you can, as the powder can spread around the room when you apply it with a powder-puff. Also, put your make-up on before your costume, so you don’t have to worry about smears or spills.
Make sure you apply the make-up to all visible areas of the face and neck, going an inch or two past where the collar will be. Don’t forget the back of the neck and the ears, if exposed. Nothing destroys an illusion faster than having a beautiful painted face turn around to reveal a naked, pasty neck. Make sure you get right up to the hairline, as well.
After you remove the make-up, be sure to use lots of moisturizer on your skin, as theatrical make-up is much more drying than everyday make-up.
Prosthetics~
These are any kind of appliance that are attached to the face to change its shape and include warts and scars, false noses and chins, fangs or “zombie teeth,” or even whole false faces. Skin appliances are usually made of soft latex rubber and are attached with a fixative called “spirit gum.” Fangs and other false teeth are hard plastic and are attached with dental adhesive.
Again, ask your costume shop clerk for a demonstration of how these are applied, and make sure you get all the necessary supplies including spirit gum and spirit gum remover. You might want to practice before the big day to make sure you can apply the prosthetics easily, and be sure they are firmly attached and dry before you begin to apply your make-up.
If you are wearing fangs, you might want to practice talking with them in ahead of time, since they usually cause a pronounced lisp until you get used to them. Also, be sure not to eat or drink anything with them in.
Masks~
An alternative to make-up is a good-quality mask. Several companies make them in hundreds of designs, some of them very startling. The best ones go entirely over your head, and are most effective when worn with a hood or with the bottom securely tucked into your collar.
If your eyes can be seen inside the mask, apply a little make-up in a matching color or black to your eyelids and around your eyes. This makes your eyes seem to “pop” out of the mask, and integrates the mask better with your skin. Look at the movie “Batman.” You’ll notice Batman wears black makeup around his eyes under his bat-mask.
You can also make a gory mask more effective by applying a little K-Y Jelly or other water-based lubricant to spots that you want to look wet or slimy (this also works on latex prosthetics).
Be sure to dry your mask completely inside and out when you’re done and if you’re planning to use it again, stuff it with a little loosely-wadded newspaper to keep its shape and prevent it from sticking to itself before you store it for any length of time.
Hair~
The quickest and easiest way to change your appearance is to put on a wig. If you normally have short, dark hair and suddenly go to Godiva-length locks, or if you cover your shoulder-length hair with white granny curls, even your closest friends will have to look twice to recognize you.
Get a look at your wig (or a store sample of it) before you buy. The hair should be sewn on in even rows, without open patches or bunching. It should look more or less like real hair, in strands, not cottony clumps. Try it on. The crown (the cloth part that the hair is attached to) should be slightly elastic and hold firmly on your head. Pick up a Styrofoam wig-form at your local beauty-supply store (these only run a few dollars) to hold your wig. If the hair hangs down loose, carefully brush out bends or folds the hair may have received in its packaging. Use a soft-bristled brush. You may pull a few strands loose, but be sure not to pull out whole clumps.
If your own hair sticks out below the crown, you’ll have to pull it up a bit and secure it with bobby pins. If your hair is long enough, braid it or pull it up with rubber bands before securing it with the pins. None of your hair should hang past the edge of the elastic band at the bottom of the crown. Once the wig is on, you may want to secure it to your own hair with a few bobby pins, although this isn’t always necessary.
You can also use your own hair. There are colored hair sprays and temporary hair dyes if you want to change the color. Bear in mind that your idea of temporary and the manufacturer’s idea of temporary may be two different things. Especially if your own hair is a lighter shade, or permed or color-treated already, it might take several washes to get the last traces of color out. If you can’t commit to at least a week of slightly unnatural hair, go back up to wigs.
Or you can just use your own hair and braid it, add accessories (like jewels for a fairy, or plastic spiders for a zombie), use gel to mold it into interesting shapes, or tease it up with lots of hair-spray for a witchy look. Try these out ahead of time to get just the look you want, and be sure to use lots of conditioner to keep from damaging your hair too much.
Costumes~
Foundation: I personally think a costume looks best when there is a smooth and uniform foundation of undergarments. Plain black or white tights and leotard, for example, for the ladies, or a plain, black cotton turtleneck for the men. You don’t want ruin the illusion by having a t-shirt with your school’s name poking out from beneath your elegant wizard’s robes, so think of the innermost layer of clothing as creating a blank canvas to hang the costume on, like a mannequin.
Robes and Capes: These are wonderful, multi-purpose pieces that can be used for a variety of costumes: witches and wizards, vampires, superheroes, ghouls, and a number of historical personas. They make you look taller, slimmer, and they drape and move very dramatically, creating a good initial visual impression. Plus they can be re-used for other outfits over time, making them immensely practical. I, for one, don’t know why they ever fell out of fashion as everyday garments.
Which is why I am begging you to get or make a good-quality cloth robe or cape, because nothing looks cheesier than a flimsy see-through robe or vinyl cape. You could have the most impressive vampire make-up in town, but if you top it with a plastic cape, it’s going to look like you’re wearing a shower curtain. I’m telling you as a friend.
Making your own basic cape is not that difficult.
Just figure out how long you want it to be and cut at least a
semicircle of material with the radius equal to the length, then
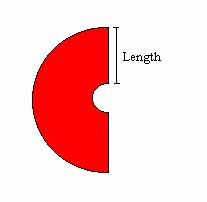 cut a smaller semicircle out of
the middle to fit around the wearer’s neck (see ill.) Or
make a full circle for a fuller cape. Hem the entire piece, and
add a clasp or closure, or even a fancy brooch to hold it closed.
The fabric need not be expensive, it just has to be opaque. In
fact, material normally used as lining, which resembles satin,
hangs and moves very dramatically and comes in dozens of colors.
cut a smaller semicircle out of
the middle to fit around the wearer’s neck (see ill.) Or
make a full circle for a fuller cape. Hem the entire piece, and
add a clasp or closure, or even a fancy brooch to hold it closed.
The fabric need not be expensive, it just has to be opaque. In
fact, material normally used as lining, which resembles satin,
hangs and moves very dramatically and comes in dozens of colors.
If you have some sewing experience, there are lots of commercially produced patterns available for more elaborate capes and robes, and if you start checking discount fabric shops early, you can usually find appropriate material at a very reasonable price. My friend Hester, a swamp-witch, wears some very interestingly textured robes, the better to blend into her marshy habitat, and often picks up the fabric for these for next to nothing at a shop that sells discontinued and leftover fabrics that no one else wants. But for her, they’re perfect.
Other Pieces: Most other costume pieces are assembled one of three ways: Found (or bought), Made, or Modified.
Found or bought pieces are perfect just the way they are. You can pick them up at the costume shop, or borrow them from a friend. If you want to dress as a bride, you just need to get a bridal gown, for instance, or as a football player, you need to get a jersey and helmet. Check thrift shops and second-hand clothing stores, too.
Making an outfit from scratch can be difficult, especially if you don’t have a lot of sewing experience. But if you do have experience, there are lots of patterns available, many that aren’t that complicated, from animals and cartoon characters, superheroes, witches and monsters, and many others. Your local fabric shop should have lots of books with pictures of the completed costumes to give you ideas. Several companies have also begun producing very detailed and elaborate historical patterns, if a royal persona is your fancy. Just be sure to give yourself plenty of time to work on your outfit, and be sure to check the fit frequently. If you don’t have sewing experience yourself, perhaps you have a friend or relative that can assist you, or, if you have the means, you could always hire a seamstress to custom-make an outfit.
Or, you could modify an existing outfit into a costume. Clothes can be dyed to the color you want, shortened or have parts removed (like sleeves), or accessories can be added on. Add a large fuzzy “H” to a sweater, wear it with a short skirt and saddle shoes and you’re a cheerleader for Horror High. Add rows of fringe to a slip dress to be a 1920’s flapper. Shred a thrift store suit and rub on a little bit of brown make-up to simulate dirt for a zombie costume.
Get familiar with your local thrift shop or consignment shop, such as Salvation Army, Goodwill, or St. Vincent DePaul Stores. These can be treasure troves of clothes that are easily adapted into costumes, like prom gowns, uniforms, vintage clothes, even tuxedos. This is where your reference pictures will come in handy, as you can mix and match pieces to adapt into a costume.
Accessories: It’s the little details that make a costume believable. The little neck scarf around the neck of the 50’s Girl, or a skull-topped walking stick for the Magician. Check second-hand stores for vintage jewelry, or go to ebay for just the right hat. Ask friends and relatives, or, if you’re creative, construct your own. I have a friend who makes little coffin-shaped handbags out of “Foam-Core” board and scrap material with a hot-glue gun and a little imagination, and every vampire lady of my acquaintance simply had to have one.
Also, don’t neglect shoes. I’ve seen the illusion created by many an elegant and elaborate costume ruined by a pair of tennis shoes. Check discount shoe stores for appropriate (or easily modified) shoes. And if an outfit calls for boots (princes and knights, I’m looking at you) bite the bullet and invest in a good pair of boots.
The Final Touches~
After you’ve created a suitably impressive costume, it’s up to you to sell the persona you’ve created. How does your character talk? Is she a cackling witch, or a moaning ghost? Does he have an accent? If so, practice that. How does your character move? Is he a proud, strutting wizard, or a shambling zombie who drags his foot? Is she a light, dancing ballerina? Practice that, too. Practice using your costume and accessories to create an impression. Sweep your cape back with a flourish, or gesture about with your magic wand.
It’s your performance, ultimately, which will set you apart from the crowd, make you more than just some guy or girl in a costume, make you into whatever persona you’ve created. Practice how you move and talk, in front of a mirror, if you can, and when the big day comes stay in character to create the best impression.
I hope this has been helpful to you. Good luck, and have a very Happy Halloween!
Originally written for the Patient Creatures website, October 2003 edition, this essay contains advice for Halloween decorating.
*******************
Halloween decorating is big business. What used to be a fairly homegrown affair, with homemade Jack-O-Lanterns, bedsheet ghosts, and scarecrows from Dad’s old flannel shirt is now the event second only to Christmas in money spent on home decoration displays. Department stores, which not so long ago might have only carried a few paper bats and cats for sale, now feature whole sections offering all manner of elaborate items to turn your house and yard into a spectacle to rival professional attractions.
But I believe the best decorations are still the homemade ones. After all, anyone can just go and buy an 8-foot inflatable witch ($89.99 at Marshall Fields), but is that really more impressive and interesting than a circle of ghosts dancing around a tree or creepier than strange shadows moving past the windows? And creating your own tableaus allows for a far larger range of themes than the usual pumpkins/witches/Frankenstein’s monster that dominates the commercial market. And far scarier ones, as well.
If you’ve been thinking about creating a spooky experience on your porch, in your yard, or in your home this Halloween, allow me to suggest a few ideas for creating the crypt, lab, graveyard, or haunted house of your dreams.
Lighting~
Lighting is the simplest way to create an eerie effect, inside and out.
Colored Lights- Dark colored lights, especially red, make everything look “off” since colors reflect differently. Colored bulbs can simply be put in your own lamp fixtures or porch lights for about $2 apiece.
Black Lights- also called ultraviolet lights,
these cause certain chemicals to fluoresce, or glow with their
light. The lights come in bulbs or fluorescent tubes (the tubes
are better for a large area). Then color anything you want to
glow with fluorescent paint (available in craft stores) or Hi-liter
markers. You can also make white cloth glow under black light
by washing it in a strong bluing solution, or in Rit Dye Whitener,
to make glowing ghosts. The Whitener can also be painted on white
cloth to create glowing patterns.
*Here’s another fun idea- replace the lights in your bathroom
with black light and tie three yellow Hi-liter markers with the
caps removed inside the toilet tank. The water will glow green
with every flush!
Strobe lights- These are lights that blink on and off very quickly. While they can be used with static displays, they’re really much more effective when people are moving around. Use them at a party (especially if you’re dancing) or turn one on just as trick-or-treaters approach your front door.
Low-Angle Lighting- Putting a light as close to the ground or floor as you can is very effective in casting creepy shadows, and a spotlight aimed at a wall or garage door can be used with paper silhouettes on strings or sticks to create a whole shadow scene.
Candles- Because candle flames move and flicker on their own, lighting with candles is the easiest way to create a Halloween atmosphere. I recommend tea lights, which are small candles in metal cups, because they burn at a cooler temperature than taper candles and don’t drip. You can put them just about anywhere, as long as they’re on a flame-resistant surface and away from things that will easily catch fire, like curtains. Small glasses, plates, and ceramic tiles all work well, and many department stores and gift shops sell tea light holders for Halloween in lots of fun shapes. If you want to put candles outside, you can put them in jars or glasses, or make luminaries of small paper bags half-filled with damp sand with a candle pressed halfway into the sand. Again, some stores sell special paper bags for this purpose printed with Halloween designs. Make sure the luminaries are on a flat, non-flammable surface, like a sidewalk or driveway.
Glow Sticks- These are plastic sticks that contain a chemical that glows for about six hours. They come in a variety of colors, and run about $1 apiece. They aren’t very bright, and you certainly couldn’t light a room with them, but they are very versatile for smaller light effects. I’ve seen people sink them in punch bowls, put them in Jack-O-Lanterns, hide them inside dolls so the light shines out through the eyes (this is very creepy in a dark room, let me tell you), and just about anywhere else you can think of. Oriental Trading has the largest color assortment I’ve seen.
Effects~
Fog- Excellent for creating atmosphere--- literally.
The best way to create fog in an enclosed space (like, say, inside your house) is dry ice. Dry ice isn’t really ice at all, it’s frozen carbon dioxide, and it’s extremely cold, about –100 degrees F, so be sure to wear protective gloves and be careful not to let it touch your skin. That being said, it’s odorless, evaporates directly from solid form into harmless carbon dioxide, and is not very expensive. To create fog, put some dry ice pellets or a block into a bucket or pot and cover it with warm water. The warmer the water, the more intense the fog, the cooler the water, the longer the fog lasts. Experiment a little to get the effect you want. You can also put some in a punch bowl or mug, but be sure it has evaporated completely before you drink (this is easy to see, as small pieces float on the surface of the liquid and jump around.)
For large areas, you will probably want to rent or buy a fog machine. A small one can be purchased for under $50. These use a chemical oil that, when heated, produces a dense, heavy smoke. This fog is NOT odorless, and can irritate people with lung conditions (like asthma), but in a well-ventilated area (like, say, outside), you should be okay. Most foggers have an on-off switch and are small enough to be carried around to distribute the fog, so with a little fiddling around you can get a natural-looking mist over your yard. Again, experiment a bit to get the look you want.
Recently, I’ve also seen electric mini foggers that can be submerged in water to create a layer of fine mist on the surface, but these are very small and used mainly for those little decorative tabletop fountains. Still, they could be used to create an effective centerpiece provided the bowl they were in was specially stocked appropriately (that little ceramic skull you use as a bookend, for instance.)
Spider-webbing- Bags of “fake spider webs” run about 59¢ in every drugstore, right alongside the little candy bars, but it takes a lot of patience to get them looking good. The secret is, the more you stretch them, the better they look, so have a lot of thumbtacks to secure the edges stretched tight. Think one bag of webs for about a 6’ x 6’ square. Use the “glow-in-the-dark” variety along with black light (see above) for a glowing web effect.
Of course, plain white string can also be used, but again, have patience with your design and string it back and forth and all around. This works really well on wooden porches with railings, going all around the rails and up and down to the roof.
In both cases, add some big hairy fake spiders, either purchased, or, even better, made yourself from papier-mâché or painted Styrofoam balls.
Sound- Of course, no scene is complete without sound. For parties, well, it depends on the crowd. For dancing, there are any number of “Halloween Party” mixes commercially available. I’m partial to the “Elvira” mixes, but most of them include the classics: Monster Mash, Ghostbusters, Werewolves of London. For a harder rocking crowd try anything by Rob Zombie. For atmospheric eeriness, go with Midnight Syndicate, Dead Can Dance, or horror movie soundtracks. Or, if you’re able to burn CDs on your computer, make your own mix of your favorite spooky songs.
To add sound to outdoor displays or for general spookiness, I recommend Disney’s “Chilling Thrilling Sounds of the Haunted House.” This is the best general spooky sound effects recording I’ve heard, with a series of short vignettes in sound. But, it’s hard to find, so if you can’t get a copy, the dozens of cheap knockoffs out there are acceptable substitutes and fairly interchangeable. Don’t pay more than a few dollars for these imitations, though.
Decorations and Props~
Silhouettes- For the money, these are easily
the most cost effective decoration in terms of creeps per dollar.
Get large sheets of black paper and make spooky bats, cats, owls,
spiders, and monsters. Hang them on the wall, or dangle small
ones inside lampshades. Or get black adhesive shelf paper to make
silhouettes that stick to windows and mirrors. Under the right
eerie lighting (see above) these simple black shadows can be very
unsettling in a way full color isn’t.
*Martha Stewart’s magazine recommended this effect: If you
have a staircase with light-colored risers (the front part of
the step) make a tall silhouette and cut it into horizontal strips,
each strip the height of a stair. Then reassemble in sequence
up the staircase so it isn’t immediately obvious what it
is until seen head on. Really, this is a very startling effect.
Dummies and Scarecrows- These are so easy. Just secure old clothes together with safety pins (including gloves at the ends of sleeves and socks at the ankles of trousers) and stuff the whole thing with wadded newspaper. Use a small cloth sack or plastic bag filled with paper for the head and add a scary mask and wig or hat. Prop them in chairs, hang them from trees (maybe by a noose), stand them on tall stakes, leave legs sticking out from under beds and bushes, or wherever. If you can get a dress mannequin or, better yet, a full-sized plastic skeleton, dress them in creepy clothes and sit them at the dinner table.
Wood-Cuts- A little more labor-intensive, but a marvelous effect. When we attended the Halloween Opera last month, the chairman on the event, Rebecca, created hundreds of wood cuts from ¼” plywood in standard shapes (moon, star, skull, round pumpkin face) and painted them with muted colors in simple patterns. She hung them from strings or mounted them on wooden dowels. They were absolutely wonderful, and we begged her for some afterwards. She graciously gifted us with several. If a hundred seems ambitious, start with a half-dozen, and hang them around your door, or on your garden gate. They’re old-fashioned and quite charming, plus they last for years. This also works well for fake grave-stones; paint them like stone with funny or creepy epitaphs and mount them on short stakes to secure them in the ground.
Shrunken Apple Heads- Peel a large apple and coat it with a mixture of ½ cup lemon juice and 2 tsp. salt to preserve it. Carve faces onto the apples with a small knife. Make the features big, since small details will be lost when they dry. You can use beads or whole cloves for eyes and grains of rice for teeth, but they look fine without these details. Set the apple faces in a warm, dry place on a wire rack and let them dry for about two weeks. Mount the dry heads on thin dowels in a flower arrangement, put them in jars, or just set them on a shelf.
Ghosts- The simplest ghosts are large balls or balloons draped with a sheet, but this basic design can be easily modified. Use a lighter, more drape-y fabric, like bleached muslin, gauze, netting, or tulle. Wash the cloth in bluing or Rit Whitener to make it react to black light (see above). Use a mask or fake skull for the head or drape the cloth over a wire armature.
Natural Items- The symbols of Halloween are the symbols of Autumn, and the harvest, so items found in the natural environment are very effective in creating the Halloween mood. Pumpkins, dried corn shocks, colored leaves, and bales of hay, of course, are typical, but what about gourds, dried flowers, and gnarled, leafless branches?
Found Items- I, personally, am on the lookout for weird and creepy items to add to the funereal décor of my home all the time, but I realize, for many people, that Halloween is not the year-round occupation it is for me. Still, it’s fun to look at items at thrift shops and rummage sales that might otherwise be of no interest through pumpkin-colored glasses. Old furniture can be re-painted and distressed. Clothes far too out-of-fashion or damaged to be worn look great on dummies (see above). Bric-a-brac that’s much too unattractive for everyday looks interesting draped in fake spider-webs under candlelight, or creates strange silhouettes placed on a windowsill. Paint baby dolls as macabre playthings. Fill interesting bottles and jars with herbs and colored liquid and display them on the mantelpiece.
Get Crafty- Finally, you can create your own props using your own special skills. Use papier-mâché or craft clay to sculpt figurines. Paint old furniture with weird faux finishes, or create strange “family portraits” to hang in the hallway. Sew your own costumes and dolls. If you’re a good wood-crafter, try your hand at large props, like coffins, or even facades to turn your lawn into a creepy castle or crypt. Let your imagination go wild.
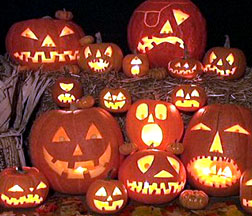
Jack-O-Lanterns~
I’ve saved the quintessential Halloween decoration for last. The Jack-O-Lantern is pretty much synonymous with the holiday. As the heart is to St. Valentine’s Day and the tree is to Christmas, the pumpkin with the face *is* Halloween. One is quite elegant. A few grouped together is grand. A dozen or more can be a most impressive display. And hundreds, as appear at Jack-O-Lantern festivals across the United States, can be a breathtaking and magnificent spectacle.
 Here
are a few Jack-O-Lantern basics: Start by cutting a 6 inch circle
around the pumpkin stem with a sharp knife, then pull this piece
out and set it aside. Using a metal spoon or other tools (see
below) remove the seeds and stringy pulp from inside the pumpkin
and discard. Scrape the inside pulp of the pumpkin as closely
and smoothly as possible. Then using a sharp paring knife, carve
the design in the pumpkin. Remember, you don’t need to cut
all the way through the pumpkin, cutting through the outer skin
and varying amounts of flesh creates a translucent effect and
allows for more fine detail (since you don’t have to worry
about the design holding together). Then put in a tea light, glow
stick, or battery powered light to illuminate your creation.
Here
are a few Jack-O-Lantern basics: Start by cutting a 6 inch circle
around the pumpkin stem with a sharp knife, then pull this piece
out and set it aside. Using a metal spoon or other tools (see
below) remove the seeds and stringy pulp from inside the pumpkin
and discard. Scrape the inside pulp of the pumpkin as closely
and smoothly as possible. Then using a sharp paring knife, carve
the design in the pumpkin. Remember, you don’t need to cut
all the way through the pumpkin, cutting through the outer skin
and varying amounts of flesh creates a translucent effect and
allows for more fine detail (since you don’t have to worry
about the design holding together). Then put in a tea light, glow
stick, or battery powered light to illuminate your creation.
But the Jack-O-Lantern need not be limited to faces (although there is wide variation even then). Pumpkin Masters™, through their books and videos, have popularized more artistic designs on pumpkins. Many magazines and websites feature these and similar creations, with faces of celebrities, movie monsters, and spooky scenes reproduced as Jack-O-Lanterns.
Abstract designs are another possibility, covering pumpkins with designs and patterns, and Martha Stewart (again) has done articles in her magazine and on her show carving them as old-fashioned gravestones, with skulls, hourglasses, and Gothic epitaphs, and with doors and shuttered windows to create Jack-O-Lantern houses for the spirits that wander the world on Halloween.
To create your Jack-O-Lantern masterpiece,
skip the plastic pumpkin-carving kits, which are pretty flimsy
and ineffective, and run by the hardware store (or down to the
workbench) for a few “professional” pumpkin carving
tools:
Plaster scrapers- to remove all the stringy pulp from inside and
make the shell thinner.
Miniature saws and keyhole saws- to make small, finely detailed
openings.
Electric drill- for small, perfectly round holes.
Linoleum cutters- to remove the outer skin and layers of flesh.
Plastic Craft Lights- sold in craft stores for ceramic Christmas
trees, you can insert these into small drill holes for color.
Glass beads also work.
Creating a Diorama~
Now that you have a lot of individual elements, you can always put them together to create a small scene. Front porches are a natural setting, or expand into the entire front yard. Inside, set aside part of a room, or a natural staging area, such as a staircase landing, or create a smaller scene on a table, on the fireplace hearth, or in a window bay.
The diorama can simply feature a few elements: Giant spiders in a web, ghosts dancing across the lawn, or a hanged man dangling from a tree limb. They can portray an eerie setting: a fortune-teller’s table with her cards and crystals ready for use, a mad-scientist’s lab table, or a graveyard shrouded in fog. Or create an elaborate scene with many elements (including family members in costume): Witches cooking up a bubbling brew, vampires rising from their graves, or an Egyptian burial chamber complete with mummy.
If the idea of a big display intrigues you but seems overwhelming, start small on a multi-year plan. Take the witch scene, for example. The first year, dress as a witch, get an old-fashioned broom, and keep the dry ice bubbling in a plastic cauldron while you hand out the goodies. Year two, get a nice, metal cauldron, a toy black cat, and arrange some odd jars with labels like “newt eyes” and “frog whiskers” along a windowsill. Year three, set up a CD player with the soundtrack from “The Exorcist,” replace your porch light with a red bulb, and attach some prop ravens to the railing. Year four, turn your front parlor into a witch’s lair with more props and lots of candles, and greet the trick-or-treaters with a cackling, “come on in, dearies…” Well, you get the idea.
Remember that any event is most valued for
the memories it creates. The candy you give the trick-or-treaters
will be gone in a day or two. The memory of the place they got
it is what will last, and bring more to your door next year. Good
luck, and have a very Happy Halloween.
Originally written for the Patient Creatures website, October 2004 edition, this essay contains advice for Halloween entertaining.
*******************
Welcome, my friends, to another thrilling Halloween season. Now
that you've got the perfect costume and your home has been beautifully
decorated it's time to throw a fabulous Halloween Party!
As with most things Halloween-related, Halloween parties have
become more common and widespread, and they've gotten much more
elaborate than the post Trick-or-Treating fetes with cookies and
punch for the kiddies, or a few pizzas and scary movie rentals
favored by most teens. Many organizations throw Charity Halloween
Balls, sometimes with tickets in the range of hundreds of dollars.
There are Halloween parades with floats and giant puppets, and
in cities like San Francisco and New York's Greenwich Village,
these parades attract tens of thousands of participants and spectators.
And adults are enjoying more private Halloween parties, as well.
Magazines which used to highlight "Spider Cupcakes"
and "Witch's Brew Punch" in their October issues, now
suggest more sophisticated fare, like "Harvest Gazpacho"
and "Boo-tinis."
No matter what your age, it's fun to dress up and enjoy good food
and spooky entertainment, so allow me to make a few suggestions
for your Halloween party this year.
|
"One year I made plaster casts of my index finger and painted them with black india ink mixed with water to give them a corpse-gray appearance. I put each in a black box nestled in moss with a black ribbon tied around the finger. The details of the invitation were printed on white paper which I splotched with more of the ink/water combo and glued to the top inside of the box... Everyone talked about those invitations forever, and most of those I invited kept the boxes and use them for Halloween decorations every year." -From Bowen in Philadelphia |
Food and Drink-
Longtime readers of my "True Ghost Stories" column will
remember that Halloween comes from the Celtic celebration of Samhain.
Since Celtic festivals were based around the planting seasons,
the traditional foods were made from whatever crops were plentiful
at that time of the year.
For modern pagans, these include late-season root vegetables like
beets and turnips, apples, corn, nuts, pomegranates, and winter
squash like acorn, butternut, and, of course, pumpkin. Since it
was also the time for animals to be brought in from the fields,
beef, pork, and mutton roasts may be served. Beverages are typically
dark and fruity, like apple cider, dark and fruited tea, coffee
flavored with spices (like cinnamon), and if you are older, mulled
wine or mead (a fermented honey drink.) Desserts are also dark
and spicy, like spiced cake or pumpkin pie.
For your Halloween celebration, it is best to take the average
age of your guests into account, and whether the party is an informal
gathering, or a more structured affair.
Let's start with the most common sort of Halloween party, for
children:
Let's be honest. Kids' tastes are pretty simple. Things that are
sweet are good. Things that look gross are good. Things with a
Halloween motif are good.
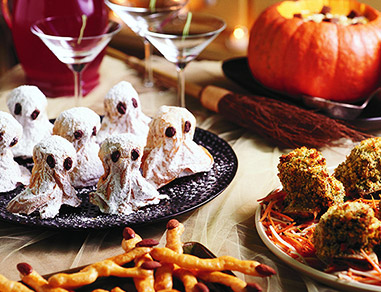
Cookies cut into Halloween shapes and decorated with colored icing
look very dramatic on a plates. Most good kitchenware shops have
cookie-cutters shaped like pumpkins, black cats, bats, and ghosts.
You can also decorate the tops of cupcakes like jack-o-lanterns,
spider-webs (with black shoestring licorice), or witches' faces
(with chocolate ice-cream-cone hats.) Finely crushed chocolate
cookies look a lot like dirt, and can be used to effect. Serve
chocolate pudding in a cup with crushed cookies on top, and add
a gummy worm, or a cookie tombstone.
Angel in West Memphis suggests a punch of Mountain Dew crossed
with Great Blue-dini Koolaid, which is radioactively green. You
can spook up your punch bowl by making an ice "hand"
to float on top. Just pour some fruit punch or water with food
coloring into a clear plastic glove, tie it shut, and let freeze
solid in the icebox. Cut the glove off with scissors and float
it in a punch of contrasting color. Or make spooky marshmallows
by rolling out regular marshmallows with a rolling pin and cutting
them into shapes with your cookie cutters. Then float them in
hot cocoa.
As your guests get older, more substantial fare is in order, but
the same ideas apply. Making your dinner party spooky is often
just a question of making your favorite recipes look just a little
"off." Use food dye to tint your chip dips vivid colors.
Use black beans in your salad, and black sesame seeds on the hors-d'oeuvres.
Use the Halloween cookie cutters on sandwiches, cheese, and slices
of fruit. And brain-shaped molds aren't just for Jello. How about
molding that cracker spread? For a treat, try caramel fondue and
thin slices of apple.
Drinks? Why, Bloody Marys, of course. Or how about a glass of
wine from Transylvania's
Vampire Vineyards?
The most ancient traditions, as I mentioned, go back to the ancient
Celts. The Celts believed that on Samhain night, the curtain that
divides the material world that we live in from the spirit world,
where ghosts travel, is at its most permeable, and it would not
be surprising to them for an ancestor or deceased relative to
come visiting. Of course, they had a number of rituals to appease
these ghostly visitors, most notably leaving out food and drink
so they need not venture any further than the front door. In Mexico,
it is traditional to take this day to visit the cemetery, and
tend to the graves. It is usually a full-day event, with the entire
family taking a picnic lunch and visiting with their neighbors.
If your family has older children, this might be a good day to
remember those who have come before. Bring out photos and light
candles, and tell stories about relatives who passed before the
children were born. Then make the traditional Celtic food for
the dead, Soul Cakes, and leave a few by the door for them.
|
3 lbs. Flour -Mix all but sugar and allspice,
put before a fire to rise (or on top of the radiator.) Add sugar
and allspice. Make into rather flat buns and bake at 350 degrees
until done. |
Fun and Games-
Naturally, my favorite Halloween party activity is telling ghost
stories. In fact, you can make this the theme of the party. Invite
all your guests to bring a story to tell or read (if there are
many guests, set a time limit) and go around the circle. I did
this at my parties for a number of years, and got some wonderful
results. One friend wrote a poem, and another regaled us with
an a cappela performance of Warren Zevon's "Roland the Headless
Thompson Gunner."
If you are having your party in a large venue, a fun game for
the younger folks is "Spider-web." This takes a fair
amount of preparation, but is good for groups like scouts or church
organizations. For each participant, take a ball of white twine.
At one end, tie a prize or gift, and hide it in the room. Then
string the twine up and down, through furniture, around posts,
until all the strings fill the room, forming an elaborate spider-web.
Make sure the room is dark when you bring the children in with
a flashlight. Maybe soften them up with a few ghost stories. Then
turn on the lights to reveal the web, and hand each child the
end of a string. They must then roll up the twine, untangling
it from the rest, to claim their prize.
Another game for large groups is "Tissue-paper Mummy."
Divide the children into groups of three or four, and give each
group a roll of toilet tissue. The group then has to design and
"dress" one of their own as a mummy, using only the
paper. Hand out prizes to each group for funniest, prettiest,
scariest, etc.
A friend of mine has three young sons who love the TV show "Fear
Factor." One weekend, while home with the boys alone (their
mother was visiting relatives) he concocted his own version of
the show. The boys did stunts, like push-ups and hopping on one
foot, and instead of chowing down on live octopus or fried spider,
they won points for such "disgusting" dishes as…
artichoke hearts, anchovy spread, and pistachio pudding with yellow
raisins stirred in. Of course, my friend didn't tell his boys
what the items were, they were just foods they weren't familiar
with. But the suggestion of the unknown was enough to make them
hesitate. I think this game could easily be adapted for a party,
with prizes for all participants.
Apple-bobbing is a Halloween game that dates back at least to
the 1700s, but once you've caught the floating apple in your teeth,
you can teach your guests about a variety of divination techniques.
The simplest involves twisting the stem of the apple until it
breaks off. For every full turn, it is said, you can expect a
child later in life. Use a vegetable peeler to take off a long
strip of apple peel, the longer, the better. Toss the strip of
peel over your left shoulder. The letter it most closely resembles
when it lands will indicate the first initial of your future spouse.
Then, using a sharp knife (or getting a grown-up to do it) cut
the apple in half from top to bottom. You and a friend each choose
a half, and count the seeds as you eat. The number of seeds indicate
the luck for the coming year:
1 seed = the same luck as the year before
2 seeds = lucky in love
3 seeds = a financial windfall
4 seeds = a long trip
5 seeds = happiness in work
6 seeds = good health
7 seeds or more = many blessings in life
|
3 Favorite Games: - From Angel in West Memphis |
Music -
Here is just a sampling of my favorite mood
music for your affair:
Midnight Syndicate -This band produces traditionally creepy
instrumental soundtracks, full of organs and chimes. I recommend
Born of the Night and Realm of Shadows. A spin-off band, Nox Arcana,
just put out their first album, Darklore Manor.
Interview with the Vampire- Motion Picture Soundtrack.
By turns lush and Gothic, then eccentric and disquieting, with
startling musical effects throughout.
Tubular Bells- by Mike Oldfield. The opening segment is
best known as the theme from the movie The Exorcist, but the entire
album is strange and evocative.
Dead Can Dance- based in ancient musical traditions, this
band frequently records odd and discordant music. Not as outright
creepy as other music mentioned, but also more complex than most.
I recommend starting with Aion.
Black Angels- by the Kronos Quartet. Perhaps their most
unsettling album, this one stayed with me for a long while the
first time I heard it. This album rewards careful listening, so
I would recommend it for your most intimate gatherings only.
Halloween- by Mannheim Steamroller. Arranger Chip Davis
has done half a dozen Christmas albums mixing traditional instruments
and electronic ones. This two-disc set for Halloween features
Classical pieces (Sorcerer's Apprentice, Ride of the Valkyries,)
original compositions, and various sound effect tableaus.
Haunted- Poe. A concept album where Poe explores the impact
of her father's death. Modern alt-rock is integrated with voice
recording of her late father and herself as a child. Interesting
and, well, haunting. (Recommended for 18 years of age and up.)
Valentine- Motion Picture Soundtrack. I certainly can't
recommend the film, which was wretched, but the soundtrack has
a nice selection of contemporary artists that would not be out
of place in a high-thrill haunted attraction, e.g. Rob Zombie,
Marilyn Manson, Filter, and Linkin Park. (Recommended for 18 years
of age and up.)
And finally, if you just want to have a few laughs, pick up the
comedy CD from Monster Comedian Don Reese, Go
Change Your Pants!
Halloween Safety-
This is no ghost story; Children are at a higher risk for accidents,
especially traffic accidents, on Halloween night. Dark-colored
costumes that restrict movement and masks that restrict visibility
plus people driving to and from parties equals DANGER for children.
If you're trick-or-treating, be EXTRA careful crossing the street,
and if you're driving, be EXTRA vigilant for little ones in the
road. Visit this site for more information and tips for everyone's
safety- http://www.halloween-safety.com/